In WooCommerce, attributes are essentially characteristics or properties of products that help to define and differentiate them. They provide additional information about the products and are used to describe the various features, variations, or specifications of items in your online store.
Examples of Attributes:
- Colour: Red, Blue, Green
- Size: Small, Medium, Large
- Material: Cotton, Polyester, Leather
What Are Attributes Used For?
- Product Differentiation: Attributes help customers differentiate between similar products. For example, a T-shirt might come in different sizes and colours.
- Filtering Products: Attributes allow customers to filter products based on specific characteristics. This is particularly useful for stores with a wide range of products.
- Creating Product Variations: Attributes are used to create variations of a product. For instance, a single product listing can have multiple variations (e.g., a shoe in different sizes and colours).
- Enhanced User Experience: Providing detailed attributes makes it easier for customers to find exactly what they are looking for, improving their shopping experience.
- SEO Benefits: Well-defined attributes can improve the SEO of your product pages by providing more specific information for search engines.
Using Attributes in WooCommerce:
- Custom Attributes: You can create custom attributes specific to your store’s needs.
- Global Attributes: These attributes can be applied to multiple products across your store.
- Variation Attributes: These are used to define variations of a product, such as different sizes or colours of the same item.
In summary, attributes in WooCommerce are a powerful tool to enhance product listings, improve customer experience, and streamline the shopping process by providing clear and concise information about the products.
Adding an Attribute
Step 1: Log in to Your WordPress Dashboard
- Open your web browser and go to your WordPress login page.
- Enter your username and password, then click “Log In.”
Step 2: Navigate to Products
- In the WordPress dashboard, hover over “Products” in the left-hand menu.
- Click on “Attributes.”
Step 3: Add a New Attribute
- On the Attributes page, you’ll see a section to add a new attribute.
- Enter the name of the attribute (e.g., “Color”), and optionally a slug (URL-friendly version).
- Click the “Add attribute” button.
Step 4: Configure Terms for the Attribute
- After adding the attribute, it will appear in the right-hand list.
- Click on the “Configure terms” link under the attribute name to add terms (e.g., specific colors like “Red,” “Blue,” etc.).
Step 5: Add Terms
- Enter the name of the term (e.g., “Red”), and optionally a slug.
- Click “Add new Color” to add the term to your attribute.
Assigning an Attribute to a Product
Step 1: Navigate to Products
- In the WordPress dashboard, hover over “Products” and click “All Products.”
Step 2: Edit an Existing Product or Add a New One
- Click on an existing product to edit it, or click “Add New” to create a new product.
Step 3: Go to the Product Data Section
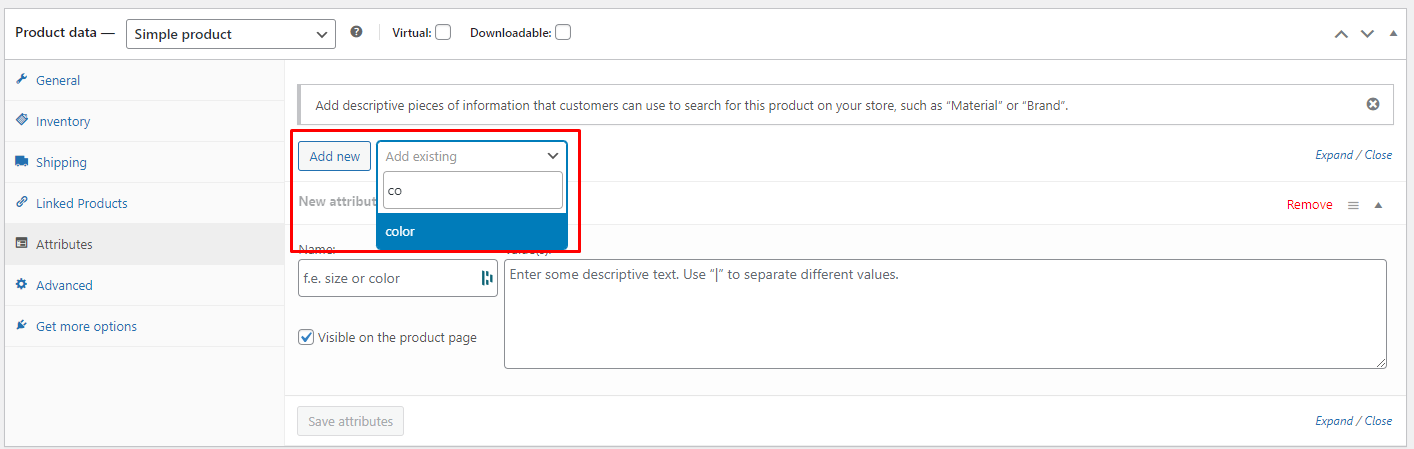
- Scroll down to the “Product data” section and click on the “Attributes” tab.
Step 4: Add Attributes to the Product
- Select the attribute you wish to add from the dropdown.
- Check the “Visible on the product page” box if you want the attribute to be visible.
- Select the terms you want to apply to the product.
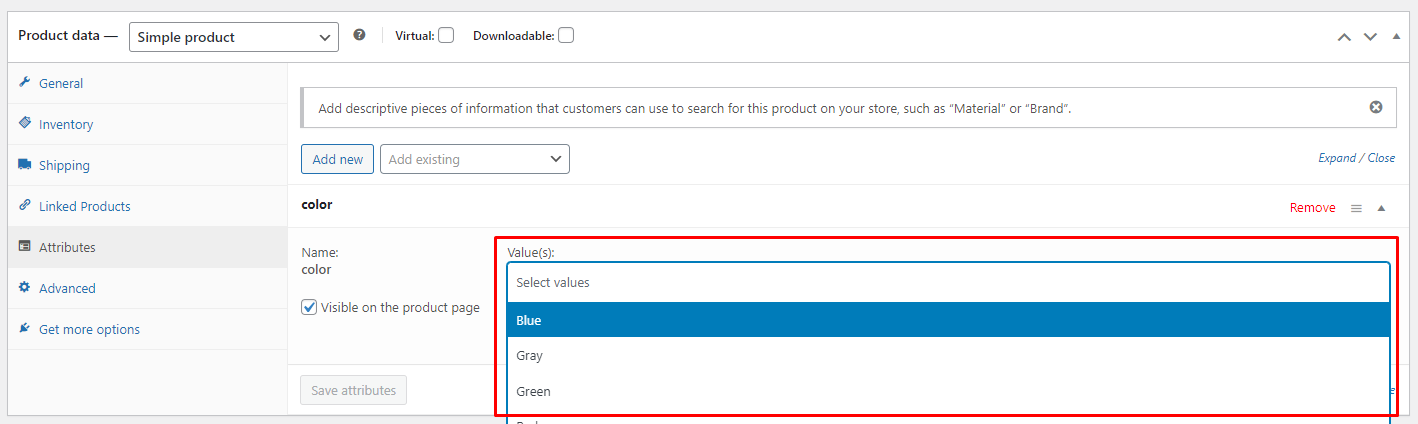
- Click “Save attributes.”
Step 5: Save the Product
- After adding the attributes, scroll up and click the “Update” or “Publish” button to save your changes.